|
As my thank-you dresses project continued, I decided to give some attention to a pattern I have had in my collection forever, but have not used. (McCall's M5701 if you are interested.) It's a real peach of a 1960s style shift. Darts add some shape in the front and help form pockets. Pleats in the back throw a little action as you walk away. My special dress for Rachael was intended to be worn with tights and boots. Dress/tights/boots = my favorite winter outfit. I used an olive linen, so technically the dress can cross over to warmer weather. I added brown accents at the collar and pockets. Of course it's fully lined. Do you even need to ask?  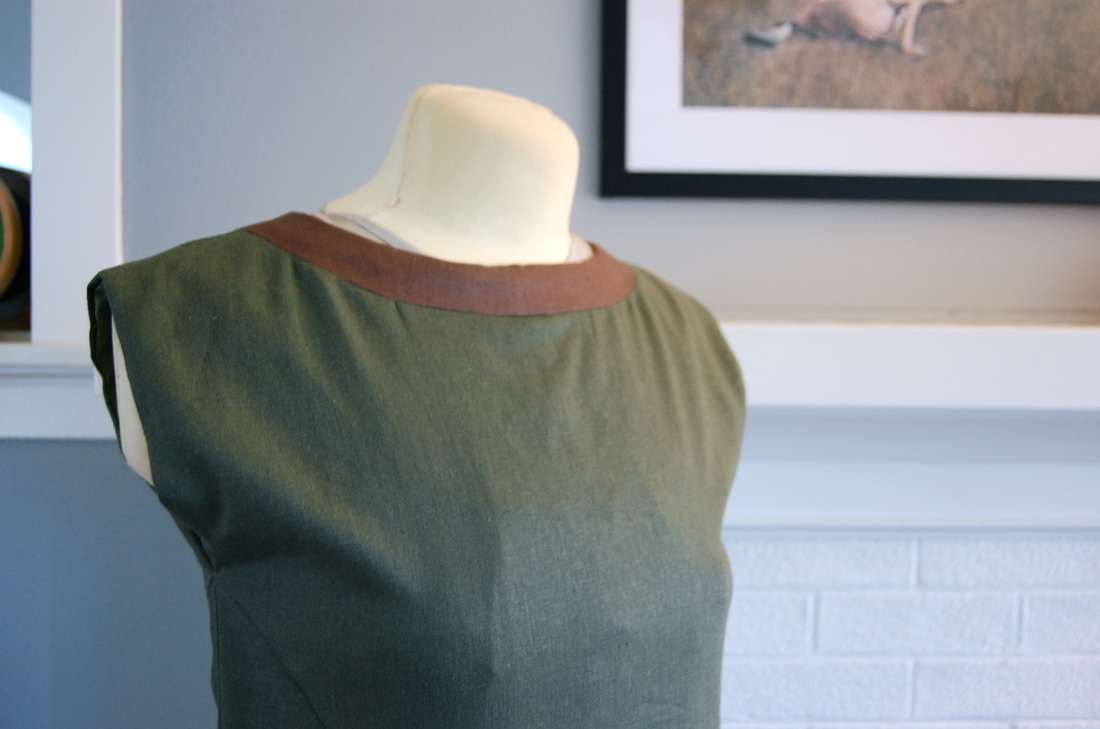  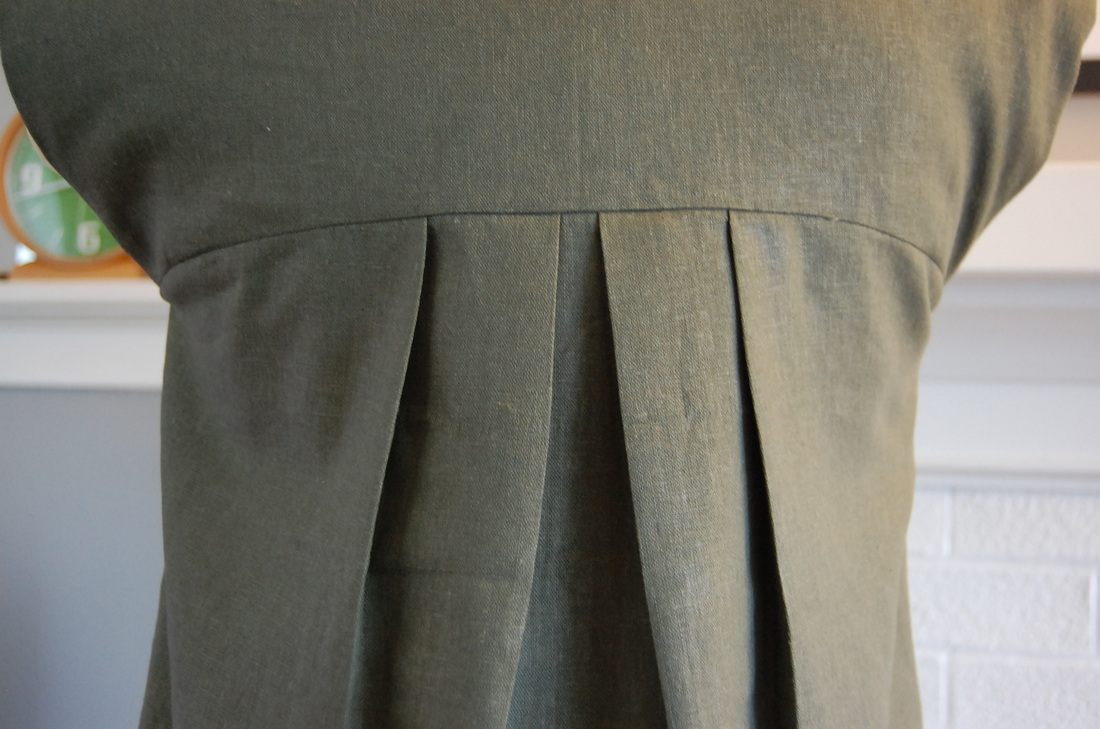 I liked the style of this dress so much, that when a special request came in from a friend's husband, I decided to use it again. This time I went with a woven black and white houndstooth pattern. I used black wool at the collar and pockets. I also added some piping to augment the pleats in back. Love! I wanted to keep it. Oh well. Them's the breaks in the dressmaking biz. Catie - I hope you dig. 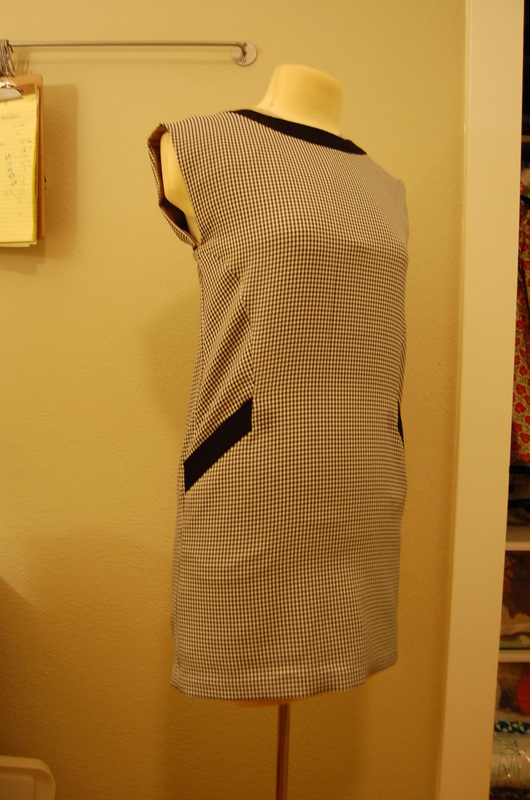 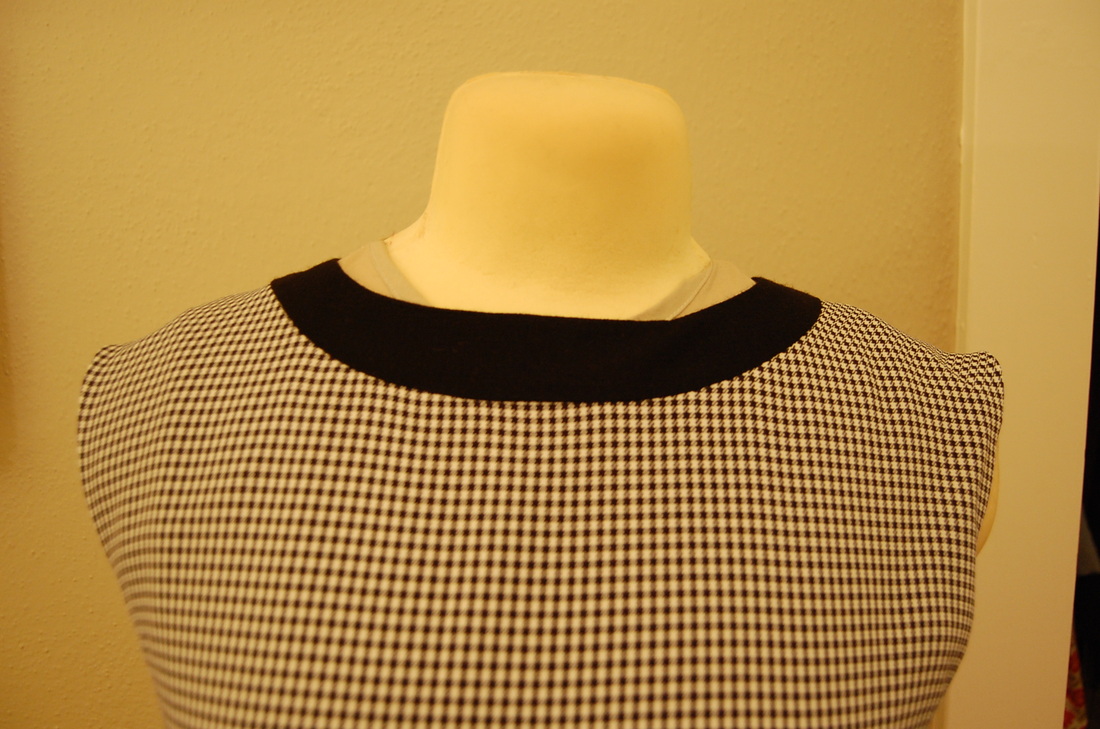   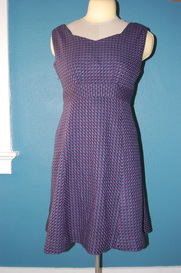 There were a number of friends who went out of their way to help me (and my husband) plan and get through our wedding dau. As a special "thank you" I made equally special dresses for some of the ladies. For Kirsten, I went with a beautiful jewel toned woven - I love the purples and teals. The shaped neckline (not too low), accentuated waist (I cut the fabric on the bias), and slightly flared skirt (six pieces) really augment Kirsten's figure (Simplicity 2644). Side zip, V-back, cute little pleats at the shoulders. I fully lined the dress in navy blue. It's a dress for fall and, with the help of tights and boots, winter too.   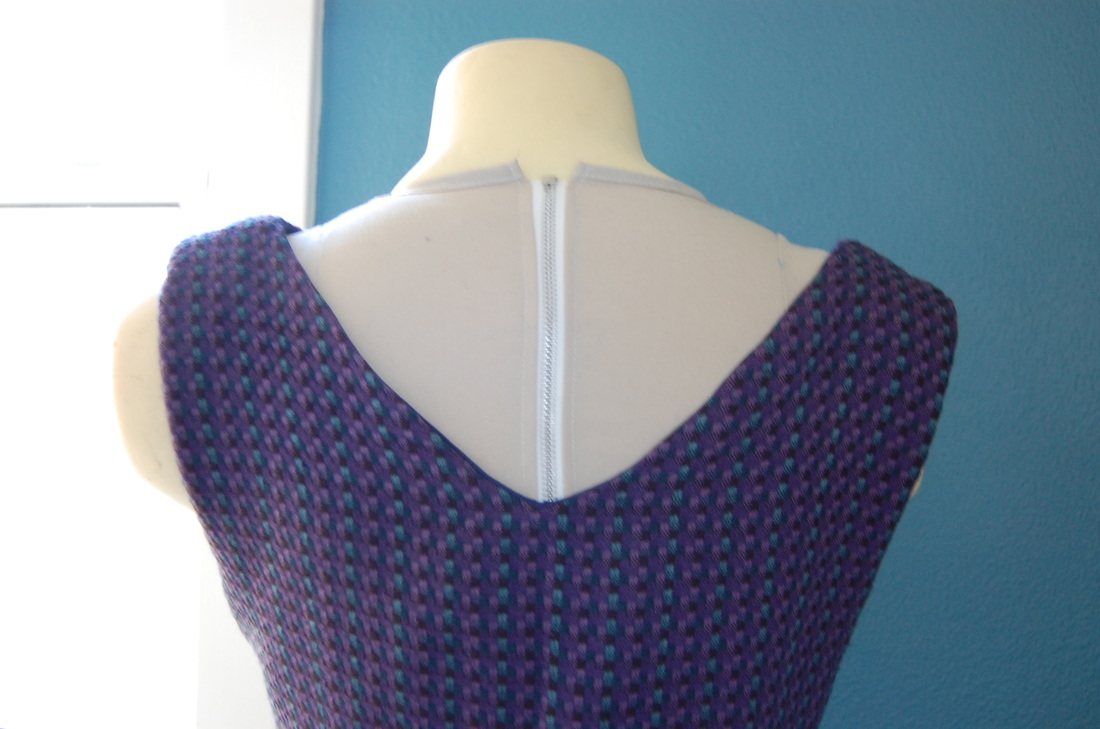 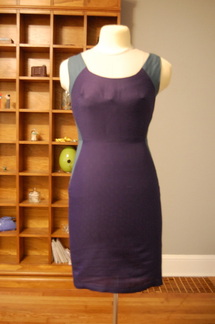 Putting a dress together for Satya allowed me to try out a pattern I have had my eye on for a while (McCall's M6394). The color blocking is precise, beautiful, and makes for a really fun dress. I wanted to make something for this particular friend that was grown-up, but not boring. Success! Back zip, fully lined (in polka dots that show if you look for them). I think this pattern will be the next dress I make for myself. Again, with the jewel tones. Maybe I need more jewels in my life. 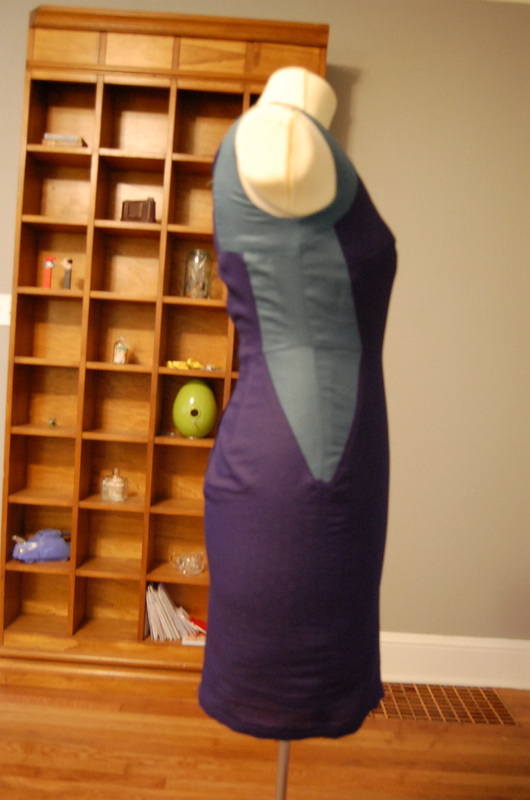 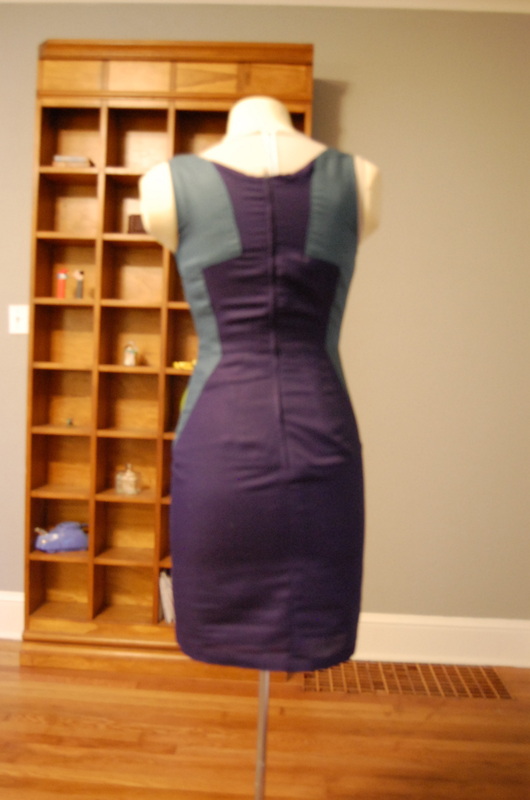 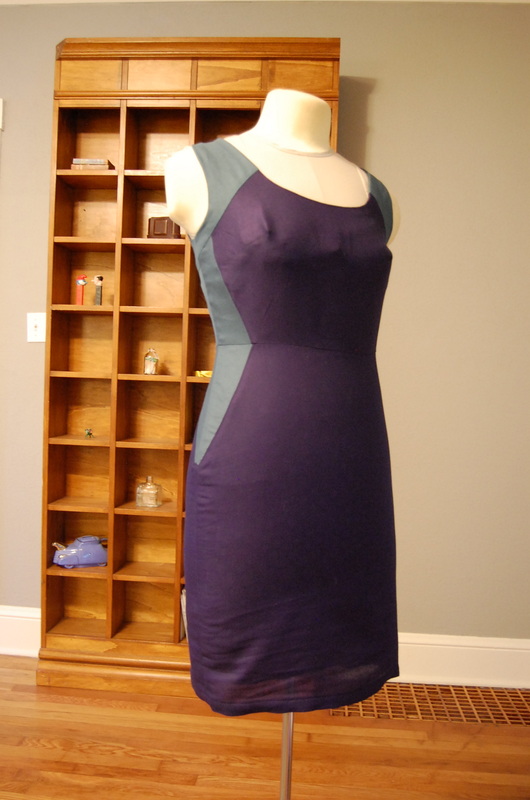 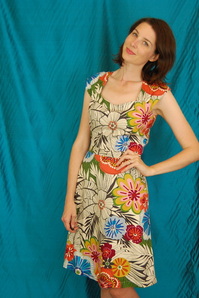 Ah, yes, the beginning . . . it's a very good place to start, I hear. In this case, the beginning is all the way back in May. I was lucky enough to be chosen as a pattern tester by Tasia over at Sewaholic. If you aren't yet familiar, she is a wonderful pattern designer based in Vancouver, B.C. The pattern I tried out was an extremely lovely dress called the Cambie. The dress itself is adorable and has pockets! You know I love that! The pattern was an absolute dream to put together. If you have been wanting to try your hand at making a dress this, kittens, could be the one. You can purchase patterns on the Sewaholic website or in select fabric shops. I will be using this pattern again. Be on the lookout. So, I made this very cute dress way back when, but what with wedding planning and all, the finished project was swept aside until now. I wouldn't have premiered the dress until October anyway - which makes me roughly 3.5 months behind schedule. A mere 3.5 months. Nothing at all, practically. So things we know: 1) Cambie Dress = awesome! 2) It's my October Dress. Yay! 3) Weddings are stressful and time consuming. 4) Pockets are the best. 5) Lack of time makes for cheesy photo backdrops. Things you don't know: 1) Shoes are optional. 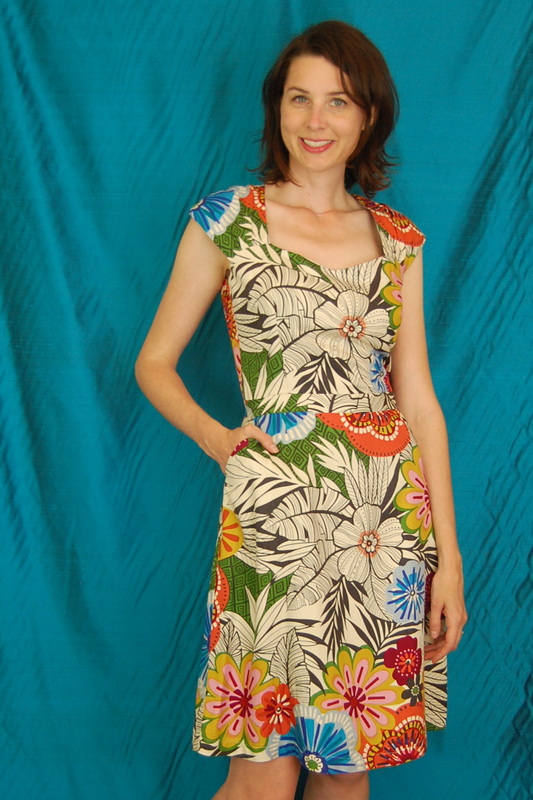 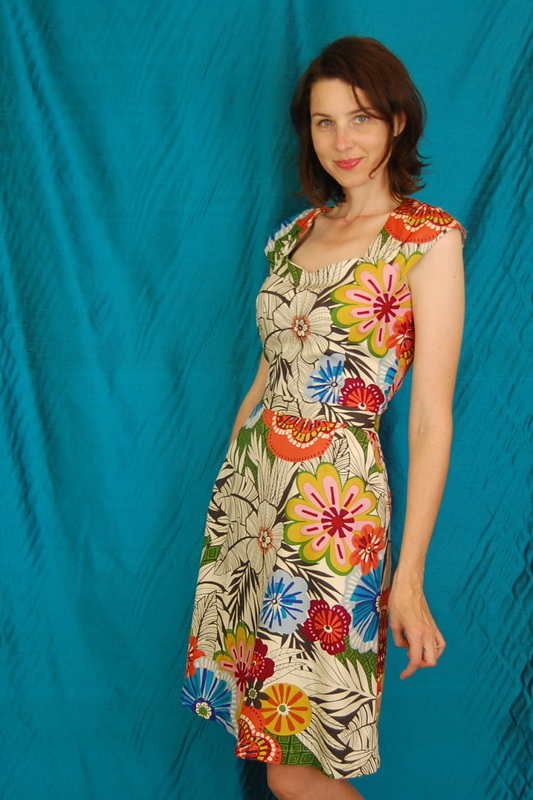 P.S. I made this dress a bit too roomy. It's my fault - I tend to overestimate my size/don't believe the tape measure - and has nothing to do with the pattern's size chart. ANYWAY, if there's a lucky lady out there who might be interested in a floral printed Cambie that happens to be a size 10/12, shoot me an email.
I know that I am behind. The truth is that I have two (2!) dresses that I should have posted by now. I just haven't felt very camera ready. I blame the stupid drizzly weather and dark evenings. They make me grumpy and tired. Thanks to my trusty dress form, I did manage to post something this month. It was an apron theme. Which is kinda like a dress. Better than nothing! Here's the "I Love the 80s" Apron ****** 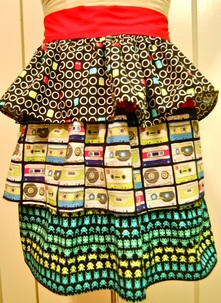 I haven’t been able to make a whole lot of time for sewing lately, but aprons are just so easy - which made this challenge was hard to pass up. In addition, I have been wanting to try a tiered, ruffled apron for quite some time. I went through my stash to find a trio of fabrics that would go together and wouldn’t you know it . . . I had three that fit into an 80s theme. (The fabrics were left over from the Great Hot Pad Holder Christmas Present Project of 2011.) Pac-Man, Space Invaders, and mix tapes: Together at last.
I used red cotton for the apron backing, waistband, and tie. To simplify things, I used red bias tape to edge the side seams. I am a firm believer that aprons should have pockets – just not this one. I wasn’t sure about placement. Inadequacies aside, I think it’s pretty cute. And I cleared out some scraps. The Facts Fabric: Cotton scraps in my collection Pattern: None. It’s just a bunch of rectangles! Year: Right now. Notions: Binding tape – also from stash. Time to complete: 1 1/2 hours First worn: Just to fit the tie. Wear again? I think this might be a gift for someone. Total price: $0 You can find this post at The Sew Weekly - with typos! I was rushed, ok? And having internet problems. Pauvre de moi.  Say what you will about Andrew Jackson, the man loved his wife. Rachel, unfortunately died unexpectedly two weeks after Jackson won the presidency and two months before he took office in 1829. Sarah Yorke Jackson (July 16, 1803 – August 23, 1887), the daughter-in-law of Andrew Jackson, and Jackson’s niece, Emily Donelson (June 1, 1807 – December 19, 1836), served as co-hostesses and unofficial First Ladies of the White House during Jackson’s tenure. Sarah and her husband, Andrew Jackson, Jr., lived, with their two children, in the White house from 1834 to 1837. Sarah’s wedding dress is pictured at left. She wore this dress at a reception and dinner shortly after her arrival to the White House. Emily served as hostess until her health declined and she ultimately died in 1836, but not before wreaking all manner of havoc in what became known as the Petticoat Affair. Well! Since you asked! Emily refused to receive Peggy Eaton, new wife of Secretary of War, John Henry Eaton due to allegations that the two had had an extramarital affair that culminated in Peggy’s first husband’s suicide. SCANDAL! The snub split the cabinet (and their wives) and caused a rift between Emily and her uncle. FUN FACT: Jackson blamed John Quincy Adams for his beloved wife's death because of repeated episodes of ridicule targeted at Rachel. You see, in 1791, Rachel thought she was divorced from her first husband and went ahead and married Mr. Jackson. Turns out this was not the case. The two married again legally in 1794. Whether intentional or not, it was common knowledge among politicos that Rachel was a bigamist. 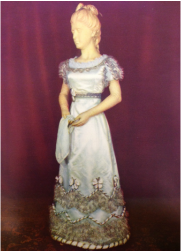 Louisa Adams was born in London, England - the only First Lady to hold the distinction of being born outside the U.S. In fact, John Quincy Adams (my favorite Twitterbug), wooed and married Louisa in London in 1797. John Adams (who was President at the time) wasn’t happy about his son marrying a non-American, but he eventually came around. After continued stints in Europe, JQ moved his family to Washington to serve as Secretary of State under James Monroe. Apparently Louisa’s drawing room became a hot gathering spot for diplomats and the politically elite. John and Louisa moved into the White House in 1825 in the midst of bitter political climate. Louisa already suffered from depression and she became a bit of a recluse. Despite all, she managed to pull off elegant events and act the gracious hostess when such duties were required. "Our union has not been without its trials," John Quincy Adams wrote. But, "she always has been a faithful and affectionate wife, and a careful, tender, indulgent, and watchful mother to our children." FUN FACT: If JQ’s diary is to be believed Louisa raised silkworms to collect the silk . . . in the White House. Everyone needs a hobby! 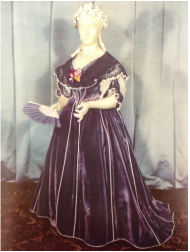 Well educated and from a wealthy Kentucky family, Mary Todd Lincoln met her future president in Springfield, IL. Abraham was 10 years her senior. The two married in 1842. They had four children, only one of whom survived Mary.
Mary was a staunch supporter of her husband's goals to save the Union. Despite some of her family's Confederate leanings, she was exceedingly loyal to Abe and his political ideology. Lincoln was regarded as the first "western" president, and while they lived in the White House Mary's manners were often criticized as coarse and pretentious. She did not have an easy time as First Lady. It probably didn't help that (based on evidence of mood swings, outbursts, excessive spending, and migraines) Mary most likely suffered from bi-polar disorder. FUN FACT: Mary Todd totally dated (or whatever they did in the 1840s) Stephen Douglas before she married Abraham Lincoln. Stephen Douglas was Abe’s contentious and outspoken political presidential rival. The only thing I love more the Presidents, are First Ladies. On this Election Day, I vote we take a moment to remember some of these interesting women. 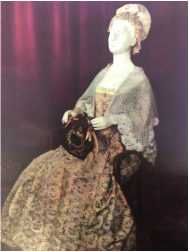 Martha Washington (June 2, 1744 – May 22, 1802) was known as “Lady Washington” because the phrase First Lady of the United States hadn’t yet been coined. Regardless, as the wife of George Washington, she is considered the first First lady. At the age of 25, she was left widowed (and rich) with four children. George and Martha married two years later in 1759. They were both in their late 20s, but didn’t have children together. They did, however, raise two of Martha’s grandchildren whose father died during the Revolutionary War. FUN FACT: Martha was opposed to her husband serving as President of the U.S. and refused to attend his inauguration. 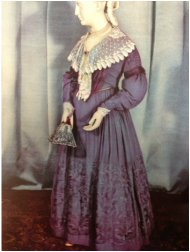 Abigail Adams (November 22 1744 – October 28, 1818) was married to John Adams, second President of the United States. She is, of course, best known for the letters she wrote to her husband during the Continental Congresses. Born into a liberal family, and despite being a sickly child, Abigail was taught to read and write. She read profusely. John and Abigail were third cousins and knew each other from childhood. The couple married in 1764 when John as 28 and Abigail 19. They had six children in ten years. During the Adams administration, the capital was moved to the wilderness of Washington. Abigail and John were the first presidential couple to preside over the White House (then known as the President's Palace (monarchy alert!) or Executive Mansion), which was still under construction when they moved in. FUN FACT: Abigail was a strong advocate for women’s property rights and for more opportunities for women, particularly in the field of education. 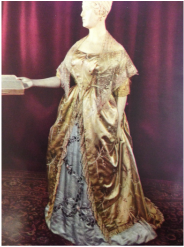 Dolley Madison (May 20, 1768 – July 12, 1849) was the wife of fourth President of the United States, James Madison. She helped shape the role of First Lady and was renowned for her social graces and hospitality. It is thought that she heavily contributed to her husband’s popularity as president by being so lovely. Dolley had occasionally filled in the ceremonial functions of First Lady for the previous administration of widower, Thomas Jefferson. Dolley lost her first husband and infant son to yellow fever in 1793. The following year, Dolley met James Madison, a forty-three year old bachelor, in Philadelphia. Madison asked his pal, Aaron Burr for an introduction. They were married after a brief courtship. Dolley brought a surviving son to the marriage. Dolley and James had no children together. FUN FACT: A Quaker, Dolley Madison was expelled from the Society of Friends when she married non-Quaker, James Madison. Images taken from my new favorite book: Brown, Margaret W. Dresses of the First Ladies of the White House (1952). Smithosonian Institution Publication, Washington.
Ideas for The Dress had been floating around my since my guy and I decided to tie the knot last December. Of course, since dressmaking is kinda my thing it was extremely important to me that I make my own wedding dress. It would have been weird for me to buy a dress that is actually The Dress. This is the big one, you know? If ever I were to be asked “Did you make it?” this is when I wanted to say “Yes, YES!”. So, since I happen to dream (in black and white) of being Myrna Loy, a long, lean, and drapey gown was what I wanted most. I also wanted a sheer silk chiffon . . . ivory with green sprigs of flowers. Alas, if there’s any two things I’ve learned during my engagement it is 1) even brides don’t always get what they want and 2) there is an end to the internets and that end is, apparently, ivory sheer silk chiffon with green sprigs of flowers on it. The fabric that I eventually fell for is off-white, synthetic (sigh.) chiffon printed with silver rings. 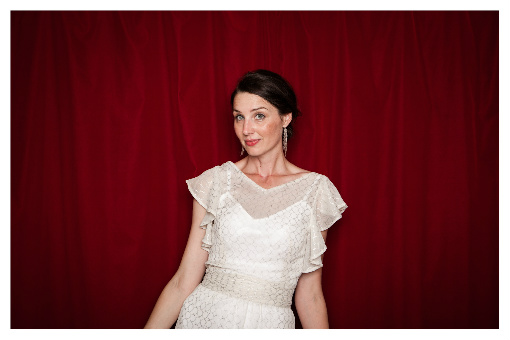
The dress in my head, of course, had amazingly intricate bias cut panels on the sides and back of the skirt, but since I was working with a symmetrical pattern (the circles are all line up in rows) the design had to be simplified. Another issue related to the fabric was that the pattern was not printed exactly on the grain. Getting everything to line up AND getting the proper drape was a challenge. It took two rounds of bodices to get the neckline right – one side would just stretch no matter what. Horror stories aside, I am pretty proud of my work and was extremely happy with the outcome. Actually, “extremely happy” sounds lame. This was The Dress after all. I really don’t have words. I will say that I might have cried a little when it was done and I tried it on. Good tears. So, in a nutshell: The entire dress is sheer, which means LOTS of really long french seams. I made a separate satin slip to wear underneath. The original intent was to have a simple gray, velvet ribbon at the waist, but I wanted to feel a little more “pulled in” so in the eleventh hour I added a fully lined waistband with gathered fabric hand stitched in place. I added an extra triangular piece to the back for drape and a slight train. Then, bias cut (at least I got something) ruffles along the bottom and up the back. Mostly I did this for weight since the fabric is so light. Also, who doesn’t like a good ruffle now and then? I mean, c’mon. High-cut v-neck dress over low-cut slip. Side zip. Ruffles for sleeves. Ta-daaaa! 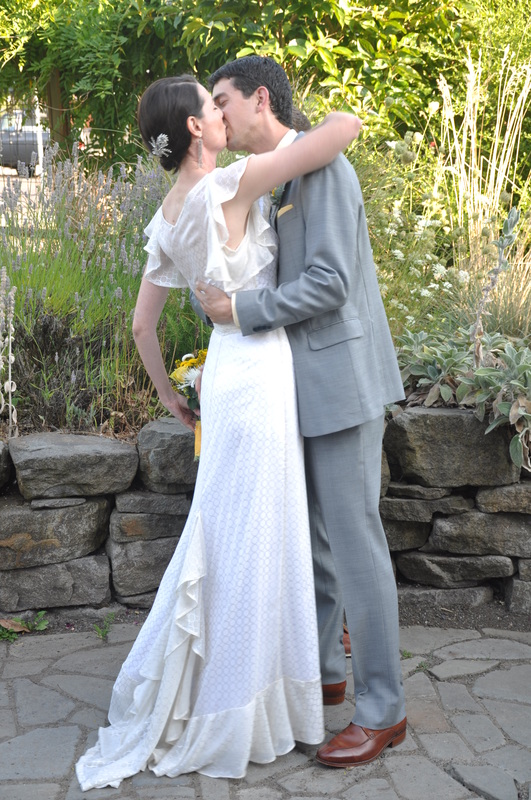 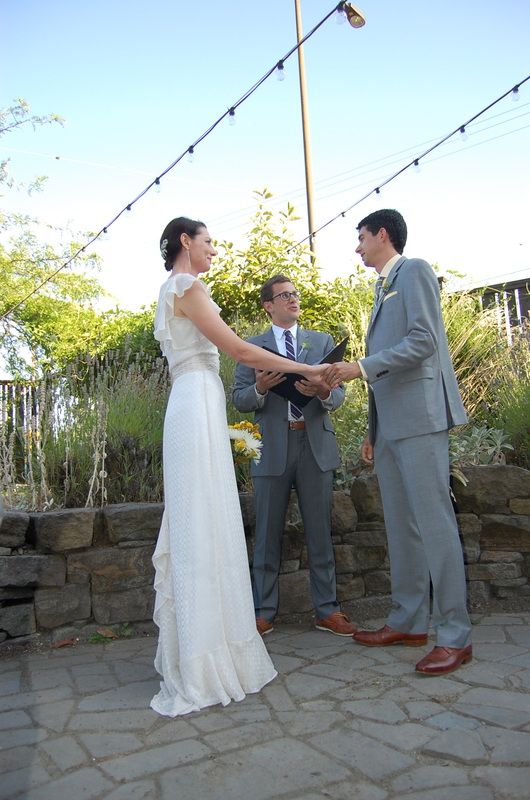 The Facts
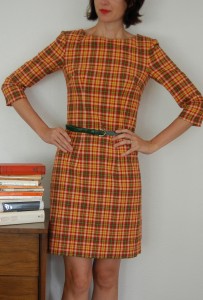
And yes, the wedding was nothing but wonderful, sweet, lovely (and love-filled) fun. I AM a happy girl. You can see how I crammed my wedding dress into this week's Gatsby-themed challenge over at The Sew Weekly. Uh, yeah. I totally know that I haven't posted my August Dress yet. a) It's coming; and b) I do what I want. Here's a dress I whipped together for September as part of the plaid challenge at The Sew Weekly. If you must know, I'm reading P.G. Wodehouse. 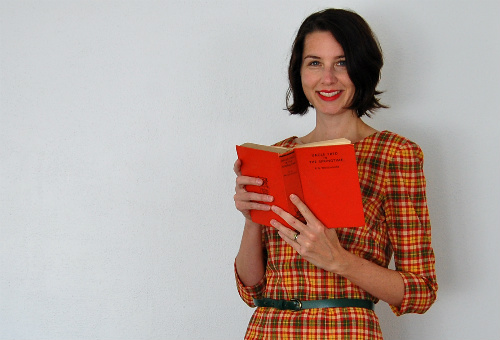 I may not have to do any back to school shopping these days, but autumn does mean cooler weather and a shift in wardrobe regardless. Goodbye tank tops and airy colors. Hello sleeves and scarves. I found this particular plaid a couple years ago. I was going through a plaid phase at the time and was really drawn to the very vintagey color combination. Now that I think about it though, the fabric looks an awful lot like the cushions in the 1974 travel trailer that my family spent summers vacationing in. Maybe not the best inspiration (consciously made or not) for a dress. I do think, however, that I should add lots and lots of simple sheath dresses to my dress collection. I also am a big fan of 3/4 length sleeves. There’s something so elegant about them. I can’t put my finger on it, maybe it’s just the bit of exposed wrist or the option to add bracelets. Maybe what I really should have done was turn this fabric into a blanket. With fall here and winter coming, I think blankets will soon be my outfit of choice. In fact, I see lots blankets in my future. Blankets and books. 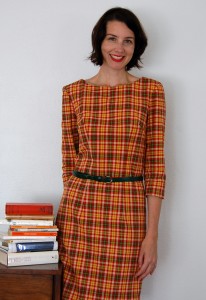 The Facts
 One of my ongoing goals has been to be able to answer "Why, yes." when someone asks if I made my dress. For the wedding weekend festivities, I tried to sport my dresses as often as possible. Believe or not, people asked and I got to answer in the affirmative. 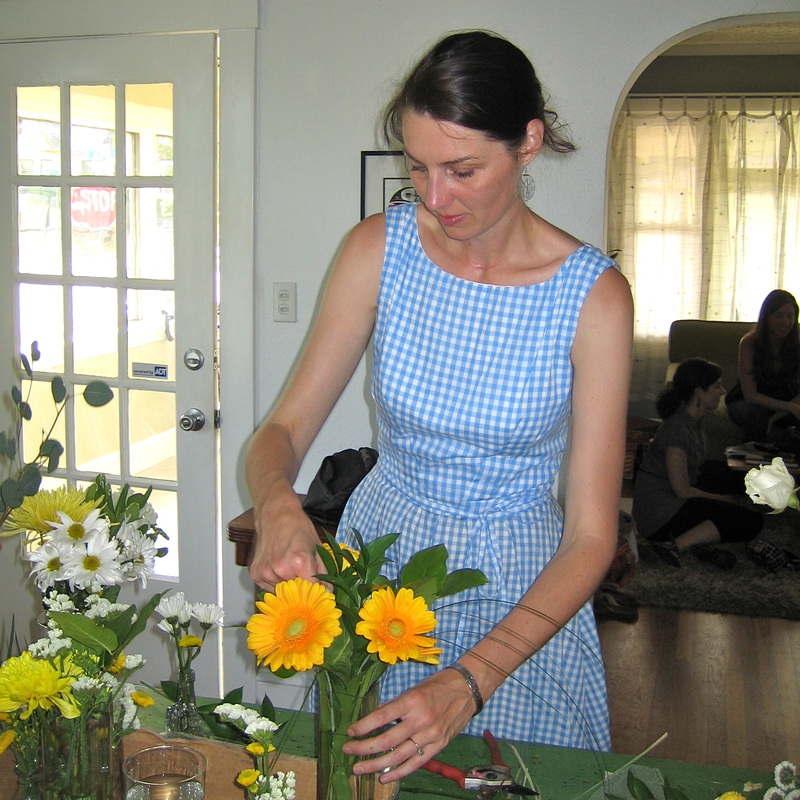 I wore my Umbrellas of Cherbourg dress for picnicking and flower arranging. (If only I had done something with my hair. Ack!)  My Uhura-inspired sheath (and, again, I am not a Trekkie (not that there is anything wrong with that)) was the perfect outfit for a wonderful dinner out as friends started coming in to town.  For the "night before mixer" (incidentally held at the bar where Doug and I met/had our first date one-day-shy-of-three-years prior), I wore one of the sundresses from the Dress Extravaganza of September 2011. Although the unmatching cardigan diminishes some of the cute, I had one friend tell me the dress was very Anthropologie. Ultimate Compliment Alert!!
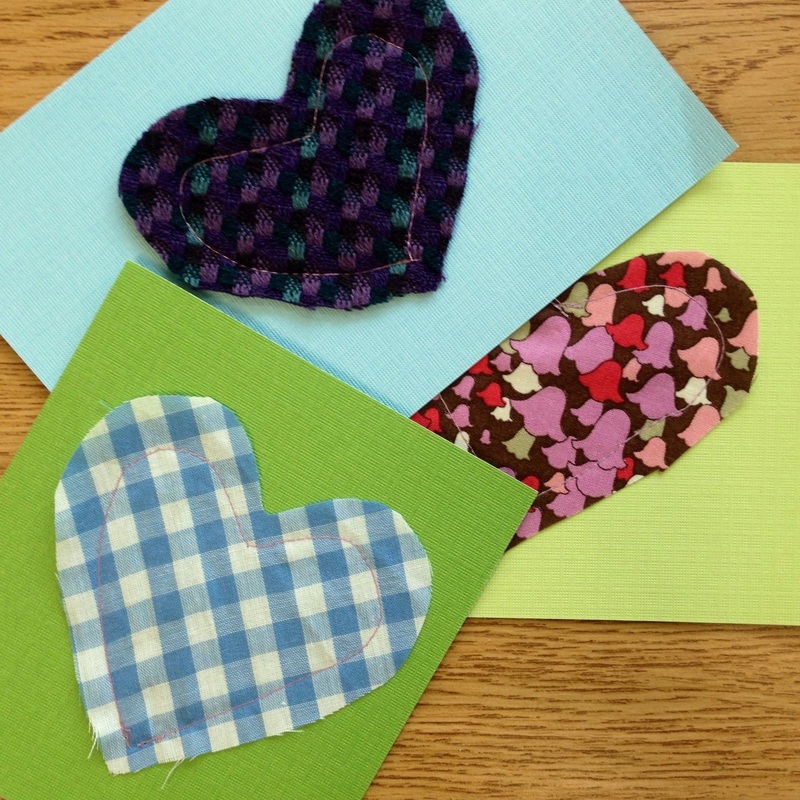
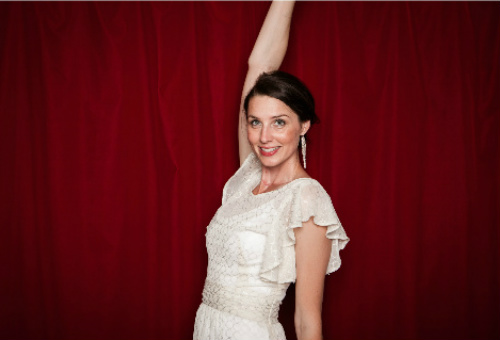
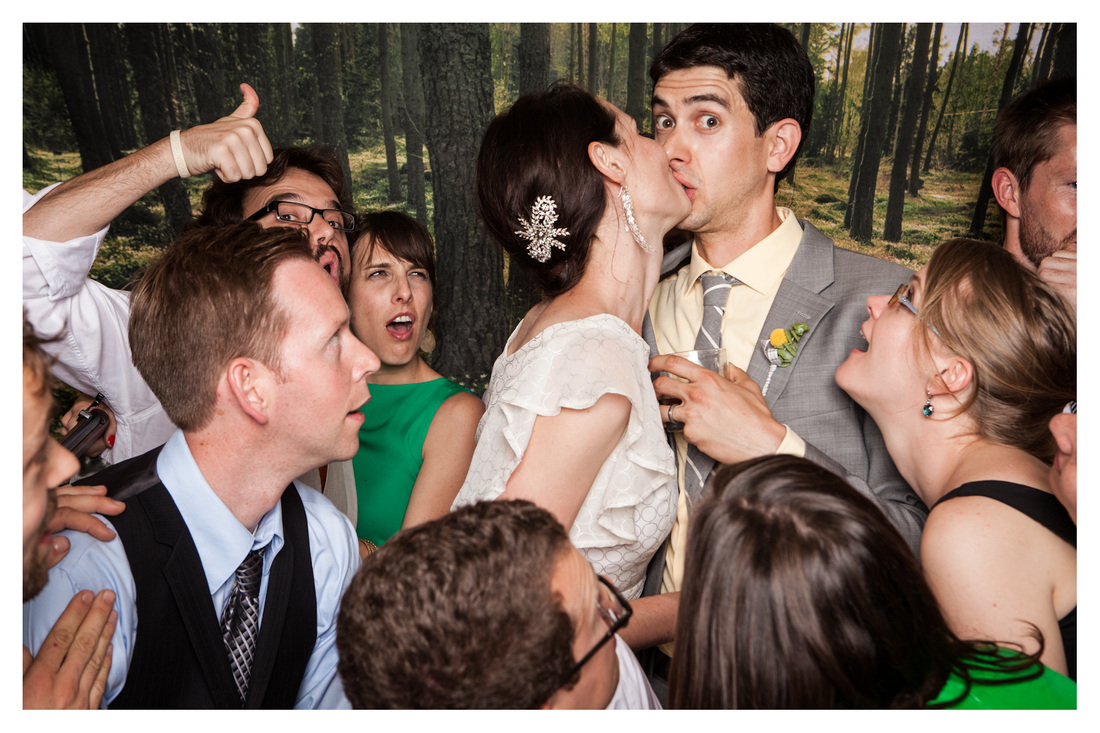
By the way, that's Rachael. She gets to be in the photo because this is the only pic I have in which I do not have crazy blazing demon eyes. (Why does that always happen to me?) Off to sew or make rice or something. OK! Bye! |
 AboutLiz Cowin lives and loves Portland, OR. She is a sucker for kittens, pretty dresses, black & white movies, and pain au chocolat. Dress of the Month Club is creative outlet and experiment in selfish dressmaking (among other things). Archives
February 2013
|
 RSS Feed
