Dress of the Month Club
  • DotMC 3.0
  • DotMC 2.0
  • DotMC 1.0
  • Girl About Town

Is White Right?

8/31/2012

 
Picture
When I first started to think about my wedding dress (about 7 months ago, not when I was 5) I really wondered if I wanted traditional white or not.  I love color so much and I feel my best when wearing bright reds, blues, and greens.  It only makes sense that on the biggest of all big days one would want to feel her most attractive.  

I knew that as far as style went, I wanted a long and lean 1930s look.  I guess it's just that classic movie buff in me.  After all, it's not every day you can try to channel Myrna, Jean, or Carole without feeling weird about it.  But the fabric had me on edge.  I kept picturing ivory with sprigs of green flowers - in sheer silk chiffon, of course.  Alas, finding something like that was impossible.  And it was not for a want of trying.

I scoured every fabric store within a 3 billion mile radius and searched to the ends of the internet and came up with nothing that lived up to my imagination.  Eventually I accepted failure (yes, the internets failed me) and narrowed my search down to three choices.  

Off white with art deco maroon flowers would make for a gorgeous gown, but seemed to wintery for an August wedding.  A green ivy pattern satisfied my desire for green, but ultimately felt too informal.  I loved the graphic yellow floral and actually bought yards and yards of that fabric.  I used it (WARNING:  this is a silly thing to do with such expensive fabric.  Do NOT try.) to prepare a mock-up for what would become my wedding dress.  Lucky for me, that test run turned out beautifully and will, when I feel like finishing it, make a lovely dress.

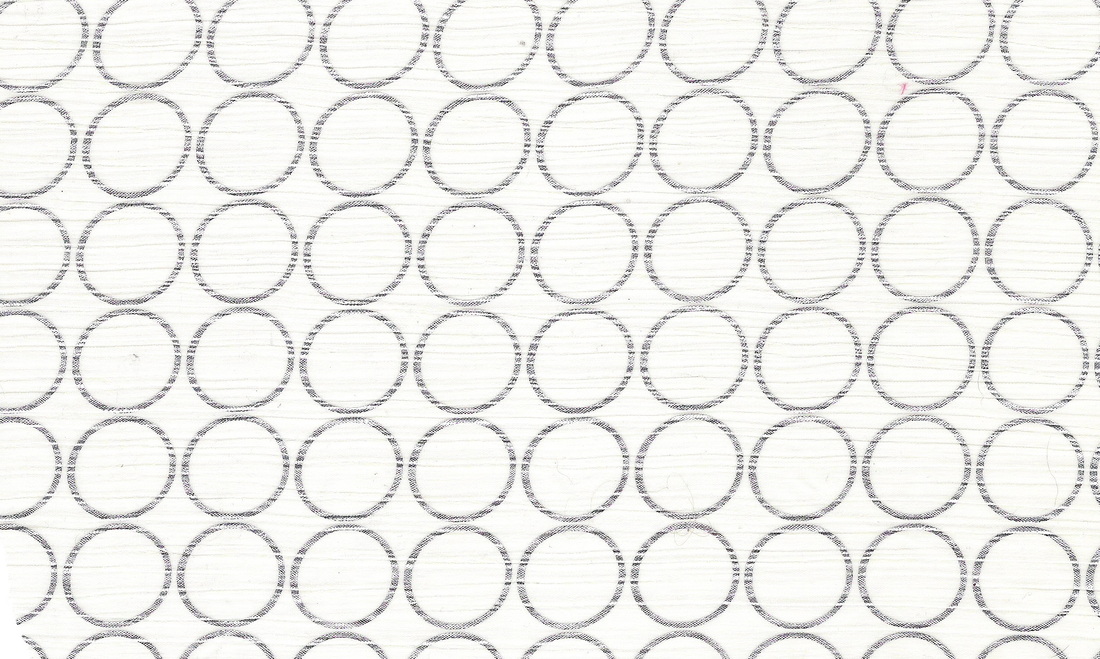
In the end, I went back to a local fabric store and, with the support of a friend, picked out a simple cream chiffon covered with quarter-sized silver circles.  The fabric wasn't silk.  It wasn't loud.  It wasn't floral.  But, it whispered my name as I walked by and promised to be the perfect dress.
Picture
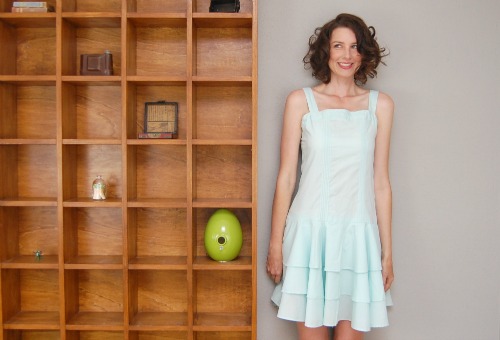
I suppose when it came right down to it, I wanted to look like a bride.  I'm a normal girl and normal girls don't get annual invitations to the Oscars or just cause to don taffeta on a regular basis.  Normal girls usually get one day to put on The Dress and feel like the most beautiful thing that ever breathed.  And if you are getting married, I guess it is pretty fitting to look like that's what you're up to.  

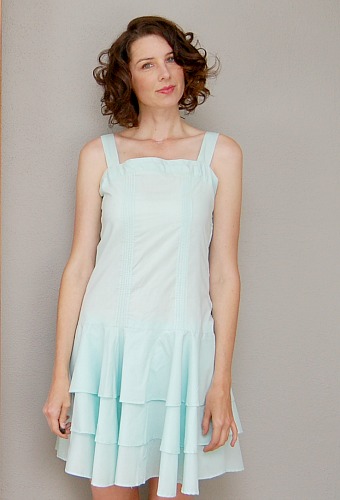
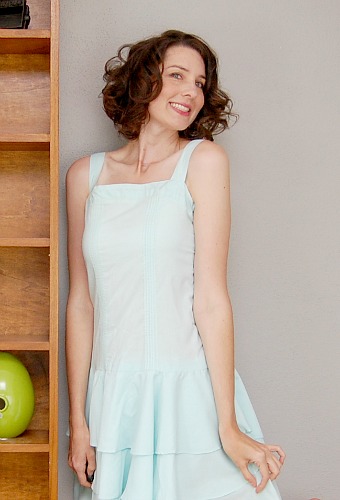
Yes, I was surprised that I ended up with a somewhat traditional white dress.  But boy my dress is pretty.  And I think it's perfect.  Just as promised.


Of course I can't ever wear it again.  So there's that.


Short and Sweet for July

7/31/2012

 
Picture
New dress and measuring cups! It was a banner day.
I'm afraid your introduction to the July Dress will have to be short and sweet.  Much like the dress itself.  

The Wedding is just shy of two weeks away and, not surprisingly, most of my attention has been put toward a dress for that occasion.  However, I did manage to kick out a simple little number (made of fabric I had lying around) for a shower my mom threw for me in California.  

The top is a white cotton with tiny red and green tulips. The bodice has a seam down the middle, so I lined it up so the tulips are vertical from the center seam.  I thought that was a nice touch.

The gathered skirt (with pockets, thank you very much) is leftover fabric from the Annie Dress (May 2009).  I added some thick grosgrain ribbon at the waist to give the appearance of a waistband. All in all, pretty cute.  

Because of the recent time constraints, I have been working mostly with sewing patterns.  This one is Simplicity 1803, which I just might revisit at some point.

Onward to August.  Lots of changes ahead!
Picture
My mom, dad, and me in the old hometown.

Going BACK in Time!

6/26/2012

 
For starters, the headline is an allusion to Back to the Future.  Also, the dress is 1920s style.  Last, I'm going to ask a favor.  Let's pretend it's May!  Thanks palsy-wals!

Now that it's May and everything- here's the dress!  Yahoo!  
Picture
No, but, for reals.  This dress is featured this week at The Sew Weekly.  The theme this time was what's trending.  I opted for the drop waisted dress.  Hope you like it!

The "Drop it Like it's Haute" Dress

One of my favorite trends that seems to be hitting the runways once again is the drop waisted dress. I’m sure the new Gatsby movie has something to do with the recent resurgence.  Though even without cinematic provocation, the drop waist seems to make a brief comeback every couple years and I’m always excited when it does.

I’ll admit, that it’s not the most flattering style in the whole world.  No bust, no waist, focal point on hips kind of works against the female figure.  Regardless, there is something so freeing about the style.  I can only imagine what it was like for women back in the day when they first chopped their hair and threw corsets aside.  It’s no wonder that lifestyles, music, and dancing got a whole lot more free at the same time.  If I knew more than just two moves (learned from watching It’s a Wonderful Life) I would have busted out The Charleston for the camera.

(I was trying to do a Clara Bow thing with my hair, but it’s just getting too long to even fake a bob.  Oh well.)
Picture
The Facts

  • Fabric:  Very thin aqua cotton.
  • Pattern:  McCall’s 4825
  • Year: The pattern is ca. 2000, but the style is oh, so 20s.
  • Notions:  Zipper, thread, fabric for lining.
  • Time to complete:  5 hours
  • First worn:  For photos.
  • Wear again?  The ruffles are a little young for me, but I love the color.
  • Total price: $0 – everything was from my stash.

Oh, I (boldly) went there!

6/12/2012

 
It's TV week over at The Sew Weekly.  Here what I came up with . . .
Picture

"The Final Frontier" Dress

There is absolutely nothing wrong with being a Sci-Fi nerd.  But I’m not one.  (And there’s nothing wrong with that either.  I am a super nerd about a great many other things.)  Star Trek isn’t an obsession for me. It is, however, pure nostalgia.  I have so many memories of watching re-runs of the original show with my dad.  Among his many other interests, my dad loves science, space, and any science/space amalgam that was ever committed to film or video.  My dad was (and is!) always go-go-go with multiple projects around the house and yard, but if “a good sci-fi movie” was on, he would turn that distraction into a break.  That’s how it was when I was growing up and nothing much has changed 20 years later.

When I catch a glimpse of Star Trek every now and then, I immediately get transported back to my younger days.  There is just something about the too bright, too warm colors of the show that remind me of spending time with my dad.  (Star Trek, lumber yards, and city dumps.  That last one is weird.)  I guess I am blessed to have had a childhood that could be described as bright and warm on just about every level.

Though I am not a Trekkie by any stretch of the imagination, I admittedly have an extremely soft spot for Scotty, Sulu, and Bones.  And, of course, Lt. Uhura.  She was always the coolest:  heavy eyeliner, short skirts, and that crazy thing in her ear.  (What was that thing?  I suppose it had something to do with being Chief Communications Officer.)  She was so stylish, self-assured, and calm.  Even as a little girl I knew her cool was deeper than mere fashion.  Uhura was the best.

Picture
For this week’s dress, I found an unfinished project that had been started way back.  The original design had a red and white racing stripe down the front and another at the collar.  That dress was too big anyway, so I took out the stripe and just sewed a seam up the front instead.  I replaced the collar piece with black pique that I had on hand.  Then I put in a zipper, faced the armholes with bias tape, and hemmed it.  Voila!  Homage to a Starfleet uniform!


The Facts
  • Fabric:  Red and black pique.
  • Pattern:  I wish I could remember. . .
  • Year:  I bought the pattern ca. 2000 when I thought it would be cool to dress like a 1960s stewardess (or a 2260′s Starfleet officer).
  • Notions:  Zipper, thread.
  • Time to complete:  1 1/2 hours (+10 years)
  • First worn:  Last week.
  • Wear again?  Maybe.  It’s simply and summery.  I don’t like how it wrinkles.
  • Total price: $0
Picture
Picture
I am so happy to have finished a long-neglected project – which has been an ongoing goal.  A knack for starting and juggling multiple tasks over long periods of time is a trait I get from my dad.  I wouldn’t have it any other way.  (Happy Father’s Day, Dad!) 

May, Oh May . . .

6/7/2012

 
I have no idea what happened to May.  In fact, I have very little recollection of that month at all.  Very curious indeed.

BUT, a dress did get made and will be posted in the very near future.  In the meantime, I continue to work on The Wedding Dress.  I just might post some clews as to what it looks like.

Until all that happens, Roger in a tutu should buy me some time.  Surely.
Picture

Flowers Not Showers!

4/13/2012

 
Picture
It has been a long, overcast winter in Portland, Oregon and just when it seemed as though the weather was about to turn for the warmer, it unexpectedly snowed.  March broke records for rainfall and April is proving to be an absolute tease.  I admit that I knew was I was in for when I moved to the Pacific Northwest from California, but a girl can only so patient.  Bring on spring.  Real spring.  As in almost summer.  In Portland, summer is the big pay off and every sunny day is consciously admired and appreciated.  Oh, summer . . .

Summer in Portland is long bike rides, late night patios, movies in the park, cold local micro-brews on tap, backyard vegetable gardens, winter amnesia, and lots of roses.  The roses are highly visible and tangible evidence that summer has not only arrived but has settled in for a while.  Every Portlander I know waits out nine months of clouds for those three glorious months of summer.  I don’t think it’s coincidence that we also spend about nine months taking leisurely, damp walks through heavily pruned, thorny, naked rosebushes in anticipation of three months of beautiful blooms.  It just goes to show that we, the residence of “Rose City”, are an optimistic lot.

As spring is just now beginning to show her sunshiny face, my dress was the only thing rosy in my neighborhood’s rose garden.  I had to hunt out patches of sun for photos and nearly froze (slight hyperbole) without my jacket.  Just for the record, my sunglasses were for function, not fashion and that is proof enough for me that rosebuds and globs of sunscreen are in my future.

My mom bought this fabric for me as a gift when I first moved to Portland, so it is especially fitting that it was used it for this week’s theme.  Regarding the dress pattern, I can’t say I am a huge fan of elastic waistbands, and I made this one a little too loose.  It kind of floats around me and the little tie I made doesn’t really fix that.  I might take it in, or maybe find a wide black belt to wear with this dress.  The print is so busy that a solid colored belt would probably be a nice touch.  In other news:  This dress has pockets.  I love that!

THE FACTS
  • Fabric:  Super slinky, floral satin.
  • Pattern: Simplicity 2360.
  • Year:  Contemporary.
  • Notions:  Thread & elastic.
  • Time to complete:  4-5 hours
  • First worn:  Last week for photos in the park.
  • Wear again?  Yes.  But perhaps belted.
  • Total price: $0
This dress was featured at The Sew Weekly as part of this week's Local Color challenge.  Consider it my homage to fair Portland.

Photos courtesy of Kirsten Collins.

"24 Wonderful Ways With Scarves"

4/12/2012

 
Not too long ago I acquired a page ripped out of the July 1969 issue of Women's Day.  Unbelievably some elderly woman had saved this page for the last 43 years.  I really hope she wore scarves daily. (Even if she didn't it's comforting to know that I'm not the only one who saves pages from magazines for far too long.)

I, for one, would like to see a resurgence in the wearing of scarves.  Specifically, beautiful silk ones.  Committing the following featured knots and ties to memory may be a start.  

When you're done with that, check out the amusing ads addressing how to handle awkward "female problems".
Picture
Picture

March MADness!

3/20/2012

 
Just in time for the much anticipated new season of Mad Men, I bring you . . .

The "Menken's Department Store" Outfit

Picture
Back in the late 1990s when all the other kids were wearing over-sized flannel, I was head-over-heels in love with shift dresses, matching boxy jackets, and pillbox hats.  My mom is exactly thirty years older than me so when she was my age, she lived that style.  For that very reason, she just didn’t get it.  In defense of my mother, I would like to admit that I just don’t get all the over-sized flannel (among other regurgitated grunge-infused trends) that have inundated fashion blogs in the past few years.  I’m in my 30s now too, so I guess that’s just what happens.  Funny though, while the 90s are making a comeback, this challenge allowed me to revisit the 60s.  Just like I did in high school.

The inspiration behind this dress comes from a few sources.  First, I have a collection of vintage patterns that I have picked up at thrift shops that I really wanted to put to use.  I have a real knack for collecting and not using.  Second, as a teenager I bought a beautiful sleeveless dress and matching long jacket in an antique shop.  The style was perfect mid 60s.  It was made of buttery yellow silk covered with an intricate asian floral motif.  According to the tags, the ensemble was handmade in Hong Kong for one Mrs. John Cline.  Or so the hand embroidered name tag in the jacket tells me.  I wore this outfit to my high school graduation (picture below, with my dad).  Just for the record – it still fits.  Also, I have still never found the perfect pair of shoes to go with it.  Third, I am still working through my stash.  This brown brocade was left with me a few years ago.  It’s not something I would have purchased for myself, but the fact that I had 4-5 yards of the fabric was, alone, a pretty convincing argument for its immediate use.    
Picture
I like the pattern of the dress.  The fitted, yet dropped, waist is a fun style.  Because I am so tall, I added some length to the waist, but I think that was a mistake. Because the dress is so fitted at the top of my hips and the fabric is a little stiff, the additional length causes the dress to bubble at my waist.   Someday, I’ll take up the skirt and shorten the waist a little, which should solve the problem.  I didn’t have enough fabric for sleeves on the dress, but sleeveless works. Plus my inspiration dress was sleeveless too.   The fabric seemed a little busy, so I streamlined the jacket i.e. no flap pockets or buttons. Looking at the pictures, though, I think the outfit could benefit from something to break up the endless mass of dark brown. Perhaps I will add a little belt or something at the waist seam on the dress.  Or use a contrasting fabric for a bow on the jacket.   I shall give the matter some more thought.
Picture
THE FACTS
  • Fabric:  Dark brown satin brocade of questionable origin. I’m sure it’s acrylic.  I had leftover lining fabric from some other projects.  The dress, jacket body, and jacket sleeve lining is all different . . . but you’ll never see that.
  • Pattern:  Simplicity 6193 for the jacket.  Vogue 6851 for the dress.
  • Year: 1965 and 1967, respectively.
  • Notions:  Thread and zipper.
  • Time to complete:  Approximately 10 hours, including thinking and planning.
  • First worn:  This week for pictures.
  • Wear again?  I just don’t know.  I will have some tweaks to make to the dress to make it fit a little more smoothly around the middle.  As for the jacket, I might add some buttons or a bow or something and then we’ll see.   Admittedly when I put it all on for the photos, I thought it was pretty adorable, but I do find so much dark brown overwhelming.  This is the second time I’ve said this of a Sew Weekly challenge, but I am not sure I like wearing brown.
  • Total Price:  Patterns – .99 each.  Zipper $2.40.  Grand total:   $4.38!
Thanks to The Sew Weekly for another fun challenge.  Photographs courtesey of  Kirsten Collins.

When in Rain . . .

2/25/2012

 
A-ha!  A bonus dress for February!  I was completely inspired by the Academy Awards challenge over at The Sew Weekly.  You KNOW I love old movies.  And almost more than that I love a good theme.  

This particular dress is copied from one that Catherine Deneuve wears in The Umbrellas of Cherbourg, as designed by Jacqueline Moreau.   I think it will be a summer favorite.  Picnic anyone?

***

Picture
I have to admit that the Academy Awards challenge is my favorite so far this year.  I happen to be a big fan of ye olde classic movies.  Initially I had some rather lofty ambitions – like that stripey number that Nora wears in the Thin Man or a sultry slip of Maggie the Cat.  I thought about channelling Clara Bow inWings or sporting over-sized men’s PJ’s like Claudette Colbert in It Happened One Night.

I wanted something iconic, but in more subtle kind of way.  I narrowed down my list of favorite films to those with my favorite costume design.    One image sort of stuck.  Think color.  Think rain.  Think music.  Now think it all in french.

The Umbrellas of Cherbourg (Les Parapluies de Cherbourg) is the sadly romantic tale of young love.  Set in a coastal town of Cherbourg, teen-aged Genevieve (Catherine Deneuve) falls in love with Guy just before he is shipped off to the war in Algeria.  Not even working in an umbrella boutique or wearing the most amazing technicolor dresses can brighten life for pauvre Genevieve.  The film is beautifully moving even without dialogue, because (surprise!) it’s a musical. A heart wrenching musical.  Oh, you’ll cry. 
Picture
Although slightly obsessive, my love for gingham dresses is not at all unrequited and not nearly as sad, thankfully.  Now I have two – this one for breezy summer days and another for fancier occasions.  So really, this particular challenge has fed multiple obsessions for me.  No complaints on my end. 
The Umbrellas of Cherbourg was not a big winner in 1965, but was nominated for Best Foreign Language Film, Best Song, Best Original Score, Best Scoring, and Best Screenplay Written Directly for Screen.  If you haven’t seen it, I suggest you do.  If for nothing else, do it for the dresses. 

The Facts:
  • Fabric:  Blue and white cotton gingham.
  • Pattern: Simplicity 2444.  I am kind of loving the bodice.  I might revisit this pattern later with a stiffer fabric.
  • Year:  2010
  • Notions: Zipper and thread.  I might have used some lace as hem tape for a fun surprise.
  • Time to complete:  Maybe 4 hours.  Although techinically, the dress is still not done.  I only remembered that I had not quite finished hand sewing the lining to the back zipper and that the dress had a few pins in it when I was mid-photo taking.  Silly me.  That’s what happens when you put a project aside for a little while.
  • First worn:  Photos. I am waiting for summer.
  • Wear again?  Yes please.  I love gingham.  (sigh)
  • Total price:  Gingham – $9.  Everything else was in my stash.

Belt Tutorial/Guest Post

2/24/2012

 
I had some fun putting a guest post together for Portland blog Sweet Athena.  If you aren't yet familiar, Sweet Athena is a fun craft and foodie blog run by two friends, Jess and Lindz. They specialize in fun projects and delicious recipes.  (Really is there more to life than that?)

I put together a tutorial for a cloth belt.  You can read about it here or there.   Enjoy!

***

Picture
As much as I would love to be sharing a tutorial on making the most awesome dress of all time, I realize that: 1) "awesome" is open to interpretation; and 2) such an amazing feat may not be accomplished in a handful of simple steps.  

Instead I vote that we split the diff, so to speak, and make ourselves an adorable little fabric belt.  You don't really need much to get started. 
Picture
SUPPLIES:
  • Fabric.  Choose something sturdy, like cotton, and without stretch.  Go nuts.  Any print you like.  How much?  See Step 1.
  • Thread.  Should match the fabric or choose something contrasting.  
  • Fusible Interfacing. It adds some stiffness and structure.  It glues itself to the fabric with you iron it on.
  • Two D rings.  You know?  Metal loops kind of shaped like the letter "D".
  • Iron.  For ironing.
  • Sewing Machine.  For sewing.
  • Scissors.  You get the gist.
  • Measuring Tape.  Obvs.
STEP 1
Use the measuring tape to measure around your waist, through the belt loops of your favorite jeans, or the circumference of wherever you will be sporting your new belt.  Take that number (in inches) and add ten more inches.  

The extra ten inches takes into consideration the finished edges, the part that encloses the D Rings, and extra tail so you can adjust your belt.  Example:  If I measure through the belt loops of my low-rise trousers the number I get is 36 inches.  Add 10 and I get 46 inches.  I need length of 46 inches of fabric.
Picture
I bought 1-inch D Rings, so the finished belt will have a width of 1 inch.  To add seams I need to include 5/8 of an inch.  We will be working on a fold, so there will only be one seam.  


Check this math:  (1" x 2) + (5/8" x 2) = 3 1/4".  Get it?  1 inch for each side plus 1 1/4" for the seams along one edge.

In my case I will need one piece of fabric that measures 46" by 3 1/4".  I'm going to use scraps I have of some really springy seersucker.  I think we all need a reminder that winter will be over.  Someday.  
Picture
STEP 2
Once you have your long strip of carefully chosen fabric, cut some interfacing of the same size.  Then iron the fusible (gluey) side of the interfacing to the wrong side of the fabric.

Oh, yeah.  Now it's starting to look professional, right?
Picture
STEP 3
Fold the strip in half the long way.  The wrong side, with the interfacing should be on the outside.  You are basically looking at an inside out belt at this point.
Picture
STEP 4
Get your machine ready.  Sew along the long edge.  Remember we measured for a 5/8" seam allowance.  

When you are finished, trim that raw edge.  Trust me, it'll make the next step easier.
Picture
STEP 5
Flip it!  Yup, you have to turn the whole thing right side out.  Everyone's got their own method.  I'm partial to using safety pins attached to one end and guiding it through.  I'll leave it up to your imagination.

STEP 6
Phew.  That was pretty rough, right?  Well, you'll be happy to hear that the worst is over.  Now you are going to want to give your belt (which is actually starting to look like a belt) a really good pressing.  Make sure the seam looks good and that everything is nice and flat.

OPTIONAL:  If you are feeling fancy, this is the part where you can do some top stitching.  You can use a contrasting thread and sew all around the long lengths or perhaps sew some zig zag stitches.  

STEP 7
Now you are going to finish one open end of the belt.  Simply fold the fabric under itself, press, and stitch.   
Picture
STEP 8
To finish up, simply slip the belt through the two D Rings. Place them about three inches from the remaining unfinished edge.  "Trap" the D Rings by folding the fabric, making a loop.  Tuck under that raw edge and sew it in place on the belt.  

You're done!
Picture
That's really all there is to it.  You should now have a fun little accessory to add to your wardrobe.  I'd love some sharing when you've finished yours!  
<<Previous
Forward>>
    Picture

    About 

    Liz Cowin lives and loves Portland, OR.  She is a sucker for kittens, pretty dresses, black & white movies, and pain au chocolat.  Dress of the Month Club is creative outlet and experiment in selfish dressmaking (among other things).

    RSS Feed

    Archives

    February 2013
    January 2013
    December 2012
    November 2012
    September 2012
    August 2012
    July 2012
    June 2012
    April 2012
    March 2012
    February 2012
    January 2012
    December 2011
    November 2011
    October 2011
    September 2011
    August 2011
    July 2011
    June 2011
    May 2011
    April 2011
    March 2011
    February 2011
    January 2011

Powered by Create your own unique website with customizable templates.